'''Blast Away the Wall''' is the sixth mission in [[RTA Guide/Whomp's Fortress|Whomp's Fortress]].
'''Blast Away the Wall''' is the sixth mission in [[RTA Guide/Whomp's Fortress|Whomp's Fortress]].
= Cannonless =
== Cannonless ==
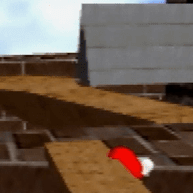
[[File:Plank push.gif|frame|right|plank "push" for more consistency]]
[[File:Plank push.gif|frame|right|plank "push" for more consistency]]
Line 31:
Line 31:
* "OG" Cannonless: uses no setup
* "OG" Cannonless: uses no setup
== Full Setup Tutorial ==
=== Full Setup Tutorial ===
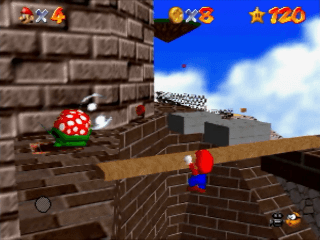
[[File:Cannonless backup movement.gif|frame|right|Back up failed cannonless with [[RTA Guide/Shoot into the Wild Blue|wild blue]]. If you need to reattempt it, you can do this backup movement to the plank, you can groundpound if you don't get enough height initially]]
[[File:Cannonless backup movement.gif|frame|right|Back up failed cannonless with [[RTA Guide/Shoot into the Wild Blue|wild blue]]. If you need to reattempt it, you can do this backup movement to the plank, you can groundpound if you don't get enough height initially]]
Line 37:
Line 37:
{{#ev:youtube|1Lf7sXbBUtY}}
{{#ev:youtube|1Lf7sXbBUtY}}
== Texture Setup ==
=== Texture Setup ===
This strat skips the ledgegrab, backflip and punch of the full setup. The visual cue for the ledgegrab is on the front face of the plank. Mario's left hand lines up with a line in the wood texture. Below is a reference an easily-identifiable part of the texture that can be used for lining this up. However, it's recommended that you perform the full setup on your own, and find a reference that works well for your display setup.
This strat skips the ledgegrab, backflip and punch of the full setup. The visual cue for the ledgegrab is on the front face of the plank. Mario's left hand lines up with a line in the wood texture. Below is a reference an easily-identifiable part of the texture that can be used for lining this up. However, it's recommended that you perform the full setup on your own, and find a reference that works well for your display setup.
Full Setup (easiest): uses normalized movement to get a consistent ledgegrab spot
Texture Setup: uses a visual cue to get to the ledgegrab spot
Salt Cannonless: uses a camera setup to fall off the plank in a consistent spot
"OG" Cannonless: uses no setup
Full Setup Tutorial
Back up failed cannonless with wild blue. If you need to reattempt it, you can do this backup movement to the plank, you can groundpound if you don't get enough height initially
This strat skips the ledgegrab, backflip and punch of the full setup. The visual cue for the ledgegrab is on the front face of the plank. Mario's left hand lines up with a line in the wood texture. Below is a reference an easily-identifiable part of the texture that can be used for lining this up. However, it's recommended that you perform the full setup on your own, and find a reference that works well for your display setup.