Mario Wings to the Sky
| Mario Wings to the Sky | |

| |
| Star Info | |
| Course | BoB |
| Height Above Ground | 232 |
| Course Records | |
| TAS World Record | 21.30[1] |
| RTA World Record | 28.87[2] |
| ABC Minimum | 0[3] |
| ABZ Minimum | 2 |
- For a tutorial on speedrunning this star, see the RTA Guide
- For a tutorial on RTABC for this star, see the RTABC Guide
Mario Wings to the Sky is the fifth mission of Bob-omb Battlefield. To complete the objective and spawn the star, Mario must fly through five rings of coins and collect the secrets, located in each ring's center.
This star is notorious for its difficulty when it comes to the A Button Challenge and CCC challenge. This is due to secrets being located very high in the air, which makes the cannon and the wing cap seem mandatory, as well as being inside coins, making coins also seem mandatory. Nonetheless, methods have been found to complete these challenges, albeit with extreme difficulty even with TAS methods.
TAS WR History
Below is a history of the WR TAS for MWttS. The current state is thought to be nearly maxed, with dar gos and Plush having saved many frames over 2012's 120 TAS.
| Date | Time | Improvement (Frames) | Improvement Author(s) | Save Description/Notes |
|---|---|---|---|---|
| Nov 30, 2006 | 32.12[4] | nesrocks | Original | |
| May 10, 2007 | 31.87[5] | 84 | Rikku | |
| Jan 2, 2009 | 31.46[6] | 12 | MrRobertZ | |
| Jan 28, 2009 | 27.70[7] | 113 | bobmario511 | |
| Sep 12, 2009 | 25.77[8] | 58 | Kymario514 | |
| Sep 23, 2009 | 24.47[9] | 39 | adika25630 | |
| Dec 8, 2009 | 23.90[10] | 17 | sonicpacker | |
| - | 23.79 | 3 | Mario2009SM64 | |
| Feb 17, 2010 | 23.46[11] | 10 | sonicpacker | |
| Aug 13, 2010 | 23.37[12] | 3 | bobmario511, sonicpacker | |
| Sep 14, 2010 | 23.37[13] | Snark122, Bauru, Nothing693, and AruaErueru | Although only matching World Record, has a different strategy. | |
| Dec 7, 2010 | 22.87[14] | 15 | Eru | |
| Before Sep 21, 2012 | 22.50[15] | 11 | Eru | |
| Nov 25, 2012 | 21.83[16] | 20 | Eru, Snark | |
| Sep 23, 2013 | 28.43[17] | Super Mario 64 Shindou Edition TAS Project | Although not a global World Record, this is the Shindou World Record. It's notable for the lack of BLJs | |
| Jun 4, 2017 | 21.73[18] | 3 | dar gos | Conserved more yaw velocity and raised speed out of BLJ |
| Jun 5, 2017 | 21.60[19] | 4 | dar gos | |
| Jun 6, 2017 | 21.57[20] | 1 | dar gos | |
| Apr 8, 2018 | 21.43[21] | 4 | dar gos | Reaches the wing cap 4 frames earlier, which allows for higher yaw and pitch values to be stored |
| Apr 15, 2018 | 21.37[22] | 2 | Plush | |
| Apr 16, 2018 | 21.33[23] | 1 | Plush, dar gos | Better yaw velocity prior to flight |
| Apr 20, 2018 | 21.30[24] | 1 | dar gos | Better flying angle after fifth secret |
Challenge details


There are 5 secrets, which are regions that Mario must pass through in order to spawn the star. Each secret as an origin point with a hitbox of 137 units, cylindrically extending upwards by 100 units and downwards by 160 units.[25] All secrets have a coin overlapped onto it with the same cylindrical hitbox of a radius of 137, but only extending 64 units up and 160 units down. Additionally, a ring of 8 coins is present vertically encircling the secret.
Gathering all secrets present a huge problem in the A Button Challenge as the secrets are located way above the ground, with the 5th secret being more than 5000 units high from the origin of the course. In Coinless challenges, the difference in hitbox means that the secret can be triggered without collecting the coin by accessing the upper 32-unit region, but unfortunately, the top coin of the ring (located at 200 units above the secret) overlaps the region completely. For both challenges, extreme techniques are employed to complete the herculean task.
A Button Challenge
History
Previously, on August 31, 2013, pannenkoek2012 collected the star with 1 A Press, which was used to launch from the cannon with a wing cap to collect the secrets in the traditional way. At the time, it was believed that constructing a goomba bridge by cloning is impossible, as the game has a limited number of object slots that can be used, and techniques of making more efficient goomba structures were not discovered yet. The method to create a goomba bridge that requires the least number of goomba clones at the time requires an exponential number of clones.
It was known that the Hat in Hand can release an object remotely at the HOLP (held object's last position) because the HOLP does not update when Mario has a hat in hand.

With the introduction of Goomba clusters and Goomba oases, the required number of goombas quickly dropped down from exponential to quadratic, leading pannekoek2012 to develop a strategy to collect all secrets. Goomba clusters are created by releasing a group of goombas using the same HOLP but from different angles, allowing multiple goombas to stack at the same location. However, due to overlapping hitboxes of these goomba clones, each goomba only has a thin region where it can be interacted with, so Mario needs to be maneuvered very carefully. The goomba oasis is created by using transport cloning, which occurs when the object is being pushed by an enemy, and releases the clone at the midpoint between its position and the HOLP, but at the HOLP's height, allowing a massive number of goombas occupying the oasis and bridging between the fourth and fifth secrets.
The TAS run was completed on May 29, 2015. It took 55 hours to create, with 2 years of planning, resulting in a run that takes 56 minutes to finish. The HOLP takes 28 goombas to reach, the oasis consists of 7 goombas, and the final goomba staircase takes 36 goombas to bridge up the oasis, totaling 71 goombas to complete the mission.
Setting up the HOLP
In order to create a goomba oasis at the ideal location, a specific HOLP needs to be achieved beforehand. Precisely, the HOLP is set at (x, y, z) = (3592, 5170, -42). In the single-star basis, the HOLP can be achieved by building a goomba staircase consisting of 28 Goombas. The process would take 22 minutes to complete[26].
However, in a full game run of 120 stars, setting up the HOLP can be done much faster by using the HOLP set from Bowser in the Sky (BitS). Therefore, in the full ABC run, Mario will first set up a specific HOLP from Bowser in the Fire Sea using techniques such as cloning, bob-omb's backward momentum, and pause buffer hitstun, in order to get to the top of BitS quickly for setting up the HOLP at (3558, 5167, -166) for Mario Wings to the Sky. The setup takes 6 and a half minutes to complete[26]. While the HOLP is slightly off by 130 units from the target, it only affects the locations used when transport cloning and does not affect the strategy.
Once Mario is done setting the HOLP, Mario will enter Bob-omb Battlefield to start collecting the secrets. If Mario used Bob-omb Battlefield to set the HOLP, he would still need to reenter the course to remove the goomba clones used to reach there.
Getting the secrets
For the first, second, and third secrets, Mario uses Backward Shell Hyperspeed in order to build up high negative speed to launch off from the mountain, allowing the lower three secrets in the air to be collected.
<tabber>
3D view=
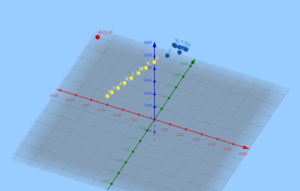
.png)
|-|
Top-down view=
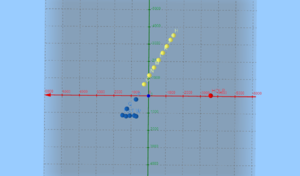
.png)
|-|
Side view=
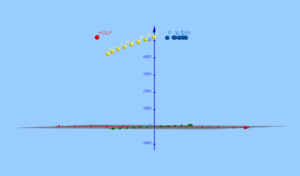
.png)
|-| </tabber>
For the fourth and fifth secrets, the secrets are too high to reach, and this is where the goomba structures come into play. The goomba oasis at the center of the stage provides Mario a way to navigate between the fourth and fifth secrets. Mario then constructs a goomba bridge between the top of the mountain and the fifth secret, then bounces on the oasis to reach the fourth secret. Once all secrets are collected, Mario collects the star to complete the mission.
During the construction to set up the HOLP, Mario takes heavy fall damage on his way down to the ground below. Fortunately, the spinning heart on his way up the mountain provides him with a way to refill his HP multiple times.
Locations of goomba oasis and goomba clusters
In the ABC run of this star, the goombas in the oasis created by transport cloning are in the following positions[27] according to Pannenkoek:
| Actual Goomba Position | Planned Goal Position (x,z) | Planned Collision Point (x,z) | |||
|---|---|---|---|---|---|
| x | y | z | |||
| HOLP (in actual run): (x,y,z) = (3592.777, 5170.298, -42.7047) | |||||
| P1 | -723.422 | 5170.298 | 211.7242 | (-750, 200) | (-5081.06, 329.7855) |
| P2 | -1250.5 | 5170.298 | 757.8965 | (-1200, 780) | (-6021.06, 1489.786) |
| P3 | -1494.17 | 5170.298 | 1137.558 | (-1420, 1220) | (-6421.06, 2369.786) |
| P4 | -1290.22 | 5170.298 | 1191.829 | (-1290, 1200) | (-6161.06, 2329.786) |
| P5 | -1078.41 | 5170.298 | 1158.104 | (-1136, 1200) | (-5853.06, 2329.786) |
| P6 | -815.142 | 5170.298 | 1151.683 | (-891, 1200) | (-5363.06, 2329.786) |
| P7 | -705.906 | 5170.298 | 1093.542 | (-719, 1200) | (-5019.06, 2329.786) |
| Final Goomba Staircase (Cluster) | |||||
| HOLP Value (x, y, z) | Number of Goombas in a cluster | ||||
| H | 1420.3 | 4273.5 | -3519.3 | 8 | |
| I | 1253.3 | 4407.1 | -3259.6 | 7 | |
| J | 1035.8 | 4540.6 | -2889.1 | 6 | |
| K | 805.5 | 4674.1 | -2496.5 | 5 | |
| L | 566.8 | 4807.7 | -2083.5 | 4 | |
| M | 306.6 | 4941.2 | -1647.6 | 3 | |
| N | 37.9 | 5074.7 | -1188.4 | 2 | |
| O | -256.7 | 5208.3 | -670.4 | 1 | |
Coinless Challenge
.jpg)
- Video (Coinless): "SM64 - Mario Wings to the Sky - Coinless"
On November 24, 2013, Pannenkoek completed Mario Wings to the Sky coinless. The run was done before he completed the mission without A presses. The TAS run was 73 minutes long.
Pannenkoek made use of premature clones, which are cloned objects that do not have some of their properties fully loaded. Using this exploit, all five secrets could be collected coinless by cloning away the top ring of coins prematurely. For the first 3 secrets, Mario brought a cork box to the island hands-free with the wing cap, waited for a while to grab the fake cork box right as it unloads, and then released a clone of the top coin immediately as it loads. Once the top coin was out of the way, Mario flew to the secret without touching the other coins.
More complicated strategies were required to reach the fourth secret[28]. Mario began by setting the HOLP somewhere in the air and putting a clone of an object with a hurt hitbox, such as a bowling ball. To do so, Mario flew to the flagpole with hat-in-hand glitch and dropped a bowling ball clone by releasing it at the flagpole (spawning it at the flagpole's height but at the HOLP laterally). Then, Mario flew towards the fourth secret with a clone, got hurt by the bowling ball, and removed the top coin by premature cloning while falling through the secret's hitbox. Because Mario was hatless, Pannenkoek held the A button during the descent to prevent fall damage killing Mario.
The last secret was extremely difficult to get, as the location was too high to release clones, and the ring was too high to reach from the ground (using a cannon will drop the object, and the location had to be reached holding hands free with a clone). Pannenkoek constructed "bowling ball centipedes" by first creating a bowling ball clone as high as he could, then set up the HOLP via a cannon shot with a wing cap, and finally dove on a bob-omb right as he got hurt with a bowling ball to set an even higher HOLP for a Goomba clone to be placed there. In the end, there were 6 tangible goomba clones and 1 bowling ball clone, where Mario would fly to the base of the structure as the wing cap ran out and bounce on the goombas to release a premature clone of the top coin, and finally collects the 5th secret while falling. To avoid taking big fall damage on the way down, a goomba clone was placed below acting as a landing pad. Mario then grabbed the star on the ground.
CCC Challenge
.jpg)
- Video 1 (Goomba cloning): "BoB Mario Wings to the Sky Coinless/Capless/Cannonless"
- Video 2 (VSC strat) "BoB Mario Wings to the Sky Coinless/Capless/Cannonless Improved Strat Using VSC"
History
CCC Challenge stands for Coinless, Capless, and Cannonless. The restriction of coinless was already difficult to circumvent, and at the time the coinless run was made, it was thought to be impossible. However, as more advanced techniques such as goomba clusters, pause buffered hitstun and Parallel Universes were found, Pannekoek began planning a route to get the secrets without collecting coins and without the aid of Wing Cap and cannons.
First Four Secrets
The run began by entering Whomp's Fortress, carrying a cork box to the top and placing a HOLP at (x, y, z) = (-1500, 5437, 1219) for the fifth secret later.
In Bob-omb Battlefield, the ring of coins surrounding the secret is only loaded one frame after Mario enters the activation radius, and not on the frame Mario activates it. Therefore, there is a one-frame window where Mario can collect the secret without touching the coins, but in order to do so, Mario needs to be move at more than 2000 speed[29], which is 10 times faster than the speed used in hyperspeed flying with wing cap in 120-Star TAS speedrun.
To execute this strategy, Pannekoek constructs a PU route. For the first secret, Mario reaches negative 1.66 million speed (3.83 million for the second secret) by pause-buffered BLJs to navigate to "midway point"[30] with an Overflow Jump (OJ), dropping down to 0.98 million speed (speed drops are done by rapidly pressing A) in order navigate up the hill[30] with another OJ, and finally dropping down to about 404 thousand speed to horizontal launch back to the main map while collecting one of the secrets. In order to have Mario stop exactly on the main map collecting the secret, the movement is set so that his final launch movement has one of its Quarter Step being out of bounds.
| Parallel Universe Path (decimals are truncated) | |||||||||||||
|---|---|---|---|---|---|---|---|---|---|---|---|---|---|
| Value | Secret 1 | Secret 2 | Secret 3 | Secret 4 | |||||||||
| y | x | z | y | x | z | y | x | z | y | x | z | ||
| Starting Point | Raw | 724 | 1841 | 4427 | 748 | 1841 | 4540 | 716 | 1841 | 4455 | 737 | 1841 | 4514 |
| Local | |||||||||||||
| PU Grid | (x, z) = (0, 0) | (x, z) = (0, 0) | (x, z) = (0, 0) | (x, z) = (0, 0) | |||||||||
| Midpoint | Raw | 840 | -61947 | -324153 | 2036 | -714394 | -267926 | 1022 | -60600 | -322545 | 0 | -69689 | -321025 |
| Local | 840 | 3588 | 3526 | 2036 | 6501 | -5818 | 1022 | 4935 | 5134 | 0 | -4153 | 6654 | |
| PU Grid | (x, z) = (-1, -5) | (x, z) = (-11, -4) | (x, z) = (-1, -5) | (x, z) = (-1, -5) | |||||||||
| Hill | Raw | 3670 | -128194 | -138106 | 3665 | -128070 | -138187 | 3670 | -128194 | -138106 | 4293 | -126226 | -136687 |
| Local | 3670 | 2877 | -7034 | 3665 | 3002 | -7114 | 3670 | 2878 | -7033 | 4293 | 4845 | -5165 | |
| PU Grid | (x, z) = (-2, -2) | (x, z) = (-2, -2) | (x, z) = (-2, -2) | (x, z) = (-2, -2) | |||||||||
| Midair | Raw | 3670 | -66406 | -72405 | 3665 | -66811 | -72446 | 3670 | -67348 | -72405 | 4293 | -66634 | -71341 |
| Local | 3670 | -870 | -6869 | 3665 | -1275 | -6910 | 3670 | -1812 | -6868 | 4293 | -1098 | -5805 | |
| PU Grid | (x, z) = (-1, -1) | (x, z) = (-1, -1) | (x, z) = (-1, -1) | (x, z) = (-1, -1) | |||||||||
| Secret | Raw | 3670 | 2863 | 1248 | 3665 | 1863 | 1252 | 3670 | 863 | 1249 | 4293 | -435 | 1248 |
| PU Grid | (x, z) = (0, 0) | (x, z) = (0, 0) | (x, z) = (0, 0) | (x, z) = (0, 0) | |||||||||
| PU Map | File:MWttS CCC PU1.JPG | File:MWttS CCC PU2.JPG | File:MWttS CCC PU1.JPG | File:MWttS CCC PU1.JPG | |||||||||
| Relative Map (See Gallery for more pictures) |
.png)
|
.png)
| |||||||||||
| 3D view of Local Map (all four paths) | Top-down view of Local Map (all four paths) | ||||||||||||
The Fifth Secret (using Goomba staircase)
Mario approaches a bob-omb to get hurt by its explosion in order to use pause-buffered hitstun to throw a cloned object at the HOLP. The object is a bob-omb exploded by a nearby water bomb and turns into a bowling ball after cloning. For constructing a goomba bridge, the cap cannot be used in the challenge, so Pannenkoek resorts to pause-buffered hitstun to release clones remotely. With a bob-omb explosion clone allowing Mario to stay under hitstun indefinitely, and a goomba clone detonating oncoming bob-ombs that would remove the hurtbox of the explosion clone, Mario can begin mass-cloning goombas.
The initial Goomba Bridge takes 45 goomba clones to complete, and it is only 1 object away from a game crash due to having too many objects on the screen. Mario begins climbing the goomba staircase, releasing a premature clone to remove the top coin. The bowling clone created earlier allows Mario to immediately reverse the direction upon hitting the secret, so as to not collect the other coins.
| Final Goomba Staircase (Cluster) | |||||
|---|---|---|---|---|---|
| HOLP Value | Number of Goombas in a cluster | ||||
| ID | x | y | z | First run (45 goombas) | Second run (38 goombas) |
| A | 1253.35 | 4635.129 | -3244.78 | 9 | 8 |
| B | 1039.486 | 4768.111 | -2864.65 | 8 | 7 |
| C | 813.4499 | 4902.193 | -2462.71 | 7 | 6 |
| D | 536.9371 | 4997.725 | -1971.01 | 6 | 5 |
| E | 243.9974 | 5093.257 | -1450.26 | 5 | 4 |
| F | -65.4559 | 5188.788 | -899.986 | 4 | 3 |
| G | -391.485 | 5284.318 | -320.371 | 3 | 2 |
| H | -733.979 | 5379.852 | 288.7814 | 2 | 1 |
| I | -1164.62 | 5433.383 | 856.1966 | 1 | 2 |
It was only after the TAS run was completed that Pannekoek found out the distance between Cluster I and the bowling ball is closer than expected. Therefore, the run was later improved by setting the HOLP at cluster I instead, since Mario actually has enough distance to slow down on its own with 2 goomba clones placed there. This reduces the number of goomba clones to 38.
The Fifth Secret (using VSC)
Pannenkoek later improves the strategy by collecting the 5th secret with vertical speed conservation, bringing the required time to complete the level down to only 3 minutes. This is done by storing a huge vertical speed by first accumulating massive horizontal speed and converting it using a double jump while holding a cork box clone to remove the top coin by premature cloning.
The procedure was done in the following steps:
- Mario grabs a bob-omb in the grassy area near the Chain Chomp for cloning.
- He passes by the Chain Chomp. The cloned Bob-omb is brought to a platform close to a ledge.
- He kills exactly 2 out of 3 Goombas at the edge of the course to manipulate object slots for cloning.
- He drops the cloned bob-omb to let it slowly walk back to its home while ensuring the Water bombs do not interrupt it.
- He holds a cork box while manipulating the water bomb (#1) to have the next countdown at the highest value (49 frames) to not interfere with object slots later.
- He drop the cork box at the launching spot (close to a ledge) and start the cork box despawn timer (30 seconds / 900 frames). Mario has to return to this spot by that point.
- He lingers slightly to let the bob-omb walk slightly closer to the ledge since Mario still has time.
- He walks back to the grassy area to activate the water bomb (#2) so that the countdown is greater than zero.
- He drops down to the lower area near the elevator and purposely lights up the fuse of a bob-omb for object slot manipulation purposes.
- As Mario begins his BLJ, the bob-omb lit up by the previous step explodes, and its coin will unload exactly one frame after the cork box unloads.
- With massive negative speed, Mario navigates to a tree and drops down to convert it from negative to positive. The launch will cross the water bomb (#2)'s launch radius.
- Mario does a double jump up the ledge, converting 1/4 of the horizontal speed into vertical speed at the expense of losing some horizontal speed.
- He lands on the first frame (on the ledge) while going to C^ mode to conserve the stored vertical speed. Mario is currently in the water bomb (#1)'s activation radius, and therefore the following procedure needs to be done very quickly.
- The cork box unloads exactly as Mario grabs the cork box, causing him to hold a fake object of Vacant Spot 1 (VS1).
- One frame later, the bob-omb's coin unloads (from step 9), and Mario is holding VS2.
- The bob-omb (from step 4) pushes Mario off the ledge to reactivate the stored vertical speed, and Mario launches upwards.
- During Mario's launch, the new cork box loads into VS1, and the cork box spawner unloads to create a new VS1. (If Mario was holding VS1 at the time, he would have cloned a new cork box)
- The Goomba (from step 3) unloads, allowing Mario to hold VS3. This is where the top coin of the ring will load into, allowing Mario to release a premature clone later.
- Mario falls through the secret's hitbox without touching the coins nearby. With -75 vertical speed from falling, only a few trajectories can reach the 32-unit area where the secret can be collected coinless.
- Mario then collects the star.
References
- ↑ "SM64 (TAS) - Mario Wings to the Sky (21"3)" by Plush
- ↑ "bob secrets 2887f" by kyman
- ↑ "SM64 - Mario Wings to the Sky - 0x A Presses" by pannenkoek2012
- ↑ "N64 Super Mario 64 "120 stars" by nesrocks in 1:42:41.33"
- ↑ "N64 Super Mario 64 "120 stars" in 1:39:02.13" by Rikku
- ↑ "Super Mario 64 - 120 Star WIP (33 Stars Done)" by MrRobertZ
- ↑ "Super Mario 64 - Task #23 Mario Wings To The Sky - 27.6" by bobmario511
- ↑ "スーパーマリオ64 スター個別TAS8枚" by ぱすた
- ↑ "Super Mario 64: Mario Wings to the Sky 24.40" by adika25630
- ↑ "SM64 - Mario Wings To The Sky by sonicpacker - 23"90 (TAS)" by SM64TASRecords
- ↑ "Super Mario 64 - Mario Wings to the Sky - 23"46 (TAS)" by sonicpacker
- ↑ "Super Mario 64 - Mario Wings to the Sky - 23"36 (TAS)" by sonicpacker
- ↑ "Super Mario 64 - Mario Wings To The Sky 23.37 - (TAS)" by AruaErueru
- ↑ "Super Mario 64 - Mario Wings To The Sky 22.87 - (TAS)" by AruaErueru
- ↑ sm64.org Records
- ↑ "(TAS) N64 Super Mario 64 "120 Stars" in 1:20:41" by sonicpacker
- ↑ "120 Stars 1:30:04 No-BLJ TAS" by Super Mario 64 Shindou Edition TAS Project
- ↑ "Mario Wings to the Sky in 21"73" by dar gos
- ↑ "Mario Wings to the Sky in 21"60" by dar gos
- ↑ "Mario Wings to the Sky in 21"57" by dar gos
- ↑ "Mario Wings to the Sky in 21"43" by dar gos
- ↑ "Mario Wings to the Sky (21"37)" by Plush
- ↑ "Mario Wings to the Sky in 21"33" by dar gos
- ↑ "Mario Wings to the Sky (21"3)" by Plush
- ↑ "Secret and Coin Hitboxes" by UncommentatedPannen
- ↑ 26.0 26.1 BoB MWttS Faster HOLP Real-Time Comparison by UncommentatedPannen
- ↑ MWttS Goomba Position by pannenkoek2012
- ↑ SM64 - Mario Wings to the Sky - Coinless - Secrets Breakdown
- ↑ "BoB Coinless Secret using Hyper Speed" by UncommentatedPannen
- ↑ 30.0 30.1 According to Pannenkoek's workshop, the "midway" point is (x = -1, z = -5) in the PU grid for the first, third, and fourth secret, and (x = -11, z = -4) for the second secret. The "hill" point is (x = -2, z = -2) in the PU grid for all 4 secrets. Mario will also cross a "midair" point at (x = -1, z = -1) for one frame before reaching the secret.
| ||||||||||||||||||||||||||||||||||||||||||||||||||||||||