Bowser in the Sky
- For a tutorial on speedrunning this star, see the RTA Guide
- For a tutorial on RTABC for this star, see the RTABC Guide
| Bowser in the Sky | |

| |
| Course Info | |
| Abbreviation | BitS |
| Terrain | Default |
| Setting | Sky |
| Water | None |
| Course Items | |
| Coins | 48 ( |
| Enemy Coins | 28 ( |
| Star Navigation | |
| Overview | |

| |

| |

| |
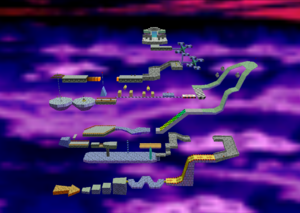
Bowser in the Sky is the third and final Bowser level. It is reached by climbing the Endless Stairs, which require 70 stars to be climbable by normal means.
Collecting the Grand Star at the end of this level is considered the win condition for most SM64 speedruns.
Coins
| Location | Count |
|---|---|
| 3 coins on the tilting "W" platform | 3 |
| 2 lines of coins on the long platform under the whomp | 10 |
| 6 coins after the first ! switch, on the raised steps | 6 |
| Line of coins on the suction-cup platform (by the 4th red coin) | 5 |
| After the 5th red coin, 3 coins on the edges of a spinning platform | 3 |
| Line of coins before the last rotating platforms | 5 |
| 7 Goombas | 7 |
| 4 Bob-ombs | 4 |
| 2 Small Piranha Plants | 2 |
| 1 Whomp | 10 |
| 1 Chuckya | 5 |
| 8 Red Coins | 16 |
| Total | 76 |
A Press Counts
In the A Button Challenge, it takes 0 A presses to beat the level with or without the red coin star. The level can be beaten with or without a preset HOLP, and is faster with that HOLP. However, both known methods of achieving this HOLP are not possible more than once without incurring additional A presses or using more time than they save.
ABC Strategy
The beginning of the level is the hardest part. It contains several subsequent platforms that are too high to get over without an A press and almost nothing to work with. Luckily, when the 207 DR technique was discovered, which utilizes a misalignment to get extra height, all of the initial platforms except the last became passable. Then, a technique called the Chuckya Drop was discovered that uses manipulation to get Chuckya to fall from above[1].
Without Preset HOLP
Leaving Chuckya behind, Mario rapidly climbs the rest of the level, using the messed-up axle location to cross the elevator. When he reaches the area past the arrow platform, he uses cloning to build a Goomba ladder. When it is finished, Mario falls down back to the start of the level. Mario actually carries Chuckya with him for a time save later[2], making heavy use of Light Chuckya via Edge to carry him quickly and with mobility. To cross gaps, butt bounces and slide kicks followed by getting thrown can be used. To cross the elevator, the messed-up axle location combined with a Chuckya throw and floor clip are used. The next gap can be crossed by throwing heavy Chuckya and being grabbed. By grinding, Chuckya can be brought onto the arrow platform. He can then throw Mario back to the checkered area. Chuckya will squeeze under the wooden obstacles as long as Mario stands on the arrow platform to lower it. With Goomba bounces and a perfectly-timed Chuckya throw, 13 Goomba clones are made unnecessary, leaving only 21.
With Preset HOLP
Setting the HOLP
The necessary HOLP can be set in either Bowser in the Fire Sea, Rainbow Ride, or Bob-omb Battlefield.
BitFS
The necessary HOLP is just above the area with the Bob-omb. Mario first uses the Bob-omb to set the HOLP directly under the needed HOLP. He then clones a fire from one of the fire spitters, using Pause Buffered Hitstun (PBH) from an explosion clone to release it without updating the HOLP, and it releases at Mario's current height, which is at the intended HOLP. Mario then glides through the air using a bloated Bob-omb, which he immediately releases upon touching the fire clone. He then proceeds to defeat Bowser by using PBH to throw him, which still causes him to appear in front of Bowser due to a quirk in Bowser's code. Then, no stars upstairs may modify the HOLP. This makes this method of setting the HOLP viable only for the any% run[3].
RR
First, a Bob-omb must be brought up to the top of the big house. This is more difficult than it sounds due to complicated handsfree teleport techniques and branches off the strat for the big house 0x. Mario then frame walks up a spire, slides down, and throws the Bob-omb in midair at the required HOLP location. He lands near the red coin star area, so he can collect the 100 coin star (because he collected all of the big house coins) and then the red coin star[4].
BoB
This is done with a Goomba staircase.[5]
In BitS
Mario crosses the elevator using the messed-up axle location as normal. When he passes the arrow platform, he uses Pause Buffered Hitstun from taking huge fall damage to throw a fire clone at the HOLP, which is on top of a pole. There are two possible poles that can be used for this. The larger of the two requires bouncing on a nearby Goomba. Once done, simple Goomba bounces and messed-up axle location uses allow Mario to reach the pipe, which he enters using a 207 DR.
Other Challenges
In the Coinless Challenge, the Grand Star can be collected. It can also be collected in the CCC Challenge.
In the Capless/Cannonless Challenge, both the regular star and Grand Star can be collected.
Neither the Grand Star nor the regular star can be collected in the No Buttons Allowed Challenge or No Joystick Allowed Challenge.
In the Pacifist Challenge, both the regular star and Grand Star can be collected, as Bowser is an exception to the pacifist rule.
In the B Button Challenge, the entire course is possible in 3 B presses, to grab Bowser 3 times. B does not need to be pressed to release Bowser, since Mario can just drop him into a mine for the first two hits and get burned while swinging him around to throw him at high speed for the third hit.
In the Z Button Challenge, the entire course is possible in 0 Z presses.
In the UBER Challenge, the Grand Star can be collected.
There are multiple unsolved challenges in this course: killing the Mystery Goomba and collecting its coin, reaching a Parallel Universe in both areas of the level, and defeating Bowser without swinging him.
Mystery Goomba
- Main article: Mystery Goomba
All Goombas in the game fall into one of two categories: singleton or triangle. Triangle Goombas have an object called a Goomba Spawner which loads and unloads them as Mario gets close. However, in Bowser in the Sky, there is a set of only two Goombas, which is actually a set of three triangle Goombas of which one instantly unloads. This one is called the Mystery Goomba, and there is no known way to kill him.
References
- ↑ "BitS Beginning - 0x A Presses" by Tyler Kehne
- ↑ "BitS Bringing Chuckya to the Goomba Ladder" by UncommentatedPannen
- ↑ "BitS Faster Strat for Any% ABC Run" by UncommentatedPannen
- ↑ "BitS Faster Strat for 120 Star ABC Run" by UncommentatedPannen
- ↑ "BoB Setting the HOLP for BitS" by UncommentatedPannen
| ||||||||||||||||||||||||||||||||