Hazy Maze Cave
- For a tutorial on speedrunning this star, see the RTA Guide
- For a tutorial on RTABC for this star, see the RTABC Guide
| Hazy Maze Cave | |

| |
| Course Info | |
| Abbreviation | HMC |
| Terrain | Default |
| Setting | Darkness |
| Water | Small |
| Course Items | |
| Coins | 92 ( |
| Enemy Coins | 47 ( |
| Stars | |
| Caps | |
| Star Navigation | |
| Overview | |

| |

| |
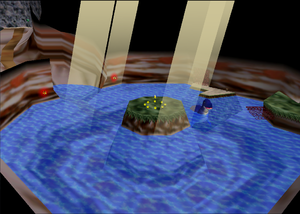
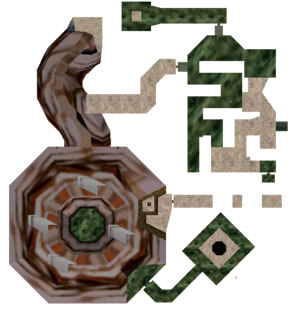
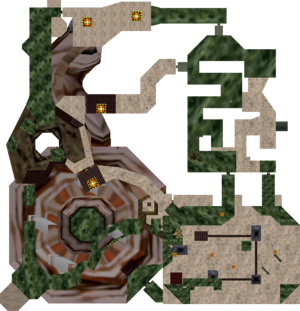
Hazy Maze Cave is the sixth course of Super Mario 64. It is located in the room behind a door without a star number in the basement and is accessed by hopping into a black-colored pool.
Course Versions
This course has no differences between versions.
Coins
This course has a total of 139 coins. There are no known ways to clone coins or extend the coin limit in this stage.
| Location | Count |
|---|---|
| Line of coins right of start | 5 |
| Line of coins before the maze | 5 |
| Line of coins on the hangable ceiling | 5 |
| Line of coins next to rolling rocks | 5 |
| Ring of coins around exclamation block, before lake | 8 |
| Ring of coins around the "Swimming Beast in the Cavern" star | 8 |
| Line of coins to "Navigating the Toxic Maze" Star | 5 |
| 11 Swoopers | 11 |
| 6 Scuttlebugs | 18 |
| 4 Snufits | 8 |
| 8 Reds | 16 |
| Blue coin block (in maze) | 35 |
| 2 Mr. I's | 10 |
| Total | 139 |
A Press Counts
In the A Button Challenge, all stars can be collected without A presses.
| Star | A Presses | Minutes |
|---|---|---|
| 1 | 0 | <1 |
| 2 | 0 | 5* |
| 3 | 0 | <1 |
| 4 | 0 | 1 |
| 5 | 0 | 2* |
| 6 | 0 | 6* |
| 100 | 0 | 3 |
| *Involves scuttlebug raising. | ||
Entering Hazy Maze Cave (0x)
- Video: https://youtu.be/uDtInisrqqM
The platform leading to the course is 205 units above the lowest floor[1]. The only known way to enter the course without pressing A is by using a Star Dance Clip using the star awarded by catching MIPS since Mario can grab onto ledges during his star dance animation. This maneuver can only be done twice as MIPS only appears twice throughout the game (when Mario has 15 stars for the first time and 50 stars for the second time), and will not reappear afterwards.
MIPS will still respawn normally as long as its star is not collected.
It should be noted that MIPS used to be required to drain the moat to access Vanish Cap Under the Moat, which can now be done faster without MIPS by exploiting the misalignments at one corner of each pillar. Unlike ground pounding the pillars with MIPS, which uses only the object (MIPS) and not the star, grabbing the ledge leading to HMC requires MIPS to be present and Mario collecting its star.
Swimming Beast in the Cavern (0x)
- Video: https://youtu.be/kd5TgsxVT7Y
Conveniently, there is a well-known glitch that allows Mario to clip through the elevator by standing at a certain black spot on the wall. When the elevator descends from above, the object collision will cause Mario to go past the wall and fall into the underground cavern, heading towards the island where the star is located.
Elevate for 8 Red Coins (0x)
- Video: https://youtu.be/lT3SnMMLY0w
Jumping off a pole requires an A press, as it is the only way to get to the nearby platform without external help. In the past, Pannenkoek collected the star in 0.5 A presses[2] by utilizing high negative speed to traverse the course and land on the moving platform necessary to reach the red coins located on higher platforms. An A press was held until this point in order to conserve speed up the elevator. In order to build such speed (more than 1500), Pannenkoek started Hyperspeed Walking (HSW) using the ceiling under the gate to keep him in place, navigated to the upper part of the course, and then bounced on a prepositioned scuttlebug to cross a large gap to clip into the red coins room.
Later in 2015, an improvement was made to reduce the A press count to 0 by Scuttlebug Raising, and the TAS run was completed on June 26, 2016. A polished run with visual explanations was uploaded on February 25, 2018.
Mario first transported two scuttlebugs to the big gap leading to the left door and entered the red coins room on the right. Next, he transported the scuttlebug in that room close to the door Mario came from for raising. Then, he went back to the big gap and bounced on the two scuttlebugs he set up previously. Once he returns to the starting area, he heads towards the red coins room and begins raising the scuttlebug near the door. The repetitive segment takes 56 minutes to complete.
Finally, Mario enters the room, grabs the pole, and patiently waits for the raised scuttlebug to drop down, pushing Mario to the nearby platform. Mario runs to the moving platform and begins completing all eight red coins to complete the mission. To reach the star (which is 300 units high[3]), Mario bounces on a nearby scuttlebug.
In December 2022, a new optimization was released for this star, saving roughly 55min. This is achieved by raising the scuttle inside the mesh wall in a way that it can drop under Mario on the pole.[4]
Metal-Head Mario can Move! (0x)
- Video: https://youtu.be/69NMgKGFKC0
Mario arrives at the underwater cavern, and he presses the switch with a metal cap to open the gate. To begin the setup of hyperspeed, Mario enters the hallway to let the scuttlebug spawn for Mario and angle it away from the door; this is done to avoid the scuttlebug jumping when it sees Mario entering with super speed when facing Mario, causing Mario's bounce to fail.
Mario builds up a large amount of negative speed by Hyperspeed Water Sliding (HSWS) on the slippery slope of the island. In order to accumulate speed, Mario enters the slippery slope and keeps in a standing position by holding C^ and enters the water, and then he gets out of the water with conserved speed by pressing Z to enter the sliding state. This is done repeatedly until Mario obtains negative 496 speed, slow enough to slide on Dorrie for 3 frames to get a sitting position for punching, but still fast enough to clip through the wall.
A faster strategy is then available once the HSW strategy is discovered, allowing Mario to build up the required speed much faster. As early as the strategy is known, it was not made into TAS until a documented it[5].
- Video: https://youtu.be/b5zwE4ALeoI
Mario has to enter the toxic maze for the star. The hardest part is exiting the maze via the doors on higher platforms, without pressing A to jump. To avoid pressing A, Pannenkoek needs very good RNG to set the swoopers flying at desirable angles and bounce on three of them at the right moment. The reason such strategy can work is that swoopers fly in three different heights: low, middle, and high; this allows Mario to bounce on them in ascending order. Afterwards, Mario can ride the elevator and collect the star.
A-Maze-Ing Emergency Exit (0x)
- Video: https://youtu.be/lwcGE7Js1QE
The two main difficulties are exiting the toxic maze and crossing the gap to the A-Maze-Ing Emergency Exit platform. In the past, Pannenkoek utilized Hyper Speed Walking again to collect the star in 0.5 A Presses[6] until the scuttlebug raising technique is found.
Mario transports the scuttlebug to a point close to the A-Maze-Ing Emergency Exit star and then exits the maze by bouncing on a Monty Mole and a flying swooper. Once Mario reaches the door leading to the star, the prepositioned scuttlebug is then being raised for 35 minutes. Finally, Mario manipulates it to lunge towards the midpoint, allowing him to bounce on it and clear the gap, landing on the platform. Mario then collects the star.
Watch for Rolling Rocks (0x)
- Main article: Watch for Rolling Rocks
- Video : https://www.youtube.com/watch?v=aFx7woWkZbc
The main breakthrough for collecting this star 0xA was the discovery that it is possible to clip the controllable platform in the red coin rooms out of bounds. The trick was named Mario's Platform Adventure, and it allowed the transport of enemies beyond their default room. This allows Mario to enter a hallway with swoopers and guide them to the nearby elevator to raise their heights and clip them through the wall onto the controllable platform. They are then brought to the room with the star and clipped back in bounds. A scuttlebug is raised up to the platform, and another swooper is lured over to the platform as well. Finally, Mario uses Vertical Speed Conservation, bounces on all three swoopers and the scuttlebug, and performs a Glitchy Ledge Grab to reach the platform.[7]
HMC 100 coins (0x)
- Video 1 (main strategy): https://youtu.be/oqji_Lr1lFc
- Video 2 (alternate, faster strat): https://youtu.be/-F61DW6eFHo
Multiple techniques are required to get 100 coins in Hazy Maze Cave, as resources are limited. Using good maneuvering, Mario dives onto a high platform to kill a Mr. I and then proceeds to the underwater cavern by clipping through a wall. Mario then collects most of the coins there before returning to the upper part of the course using the elevator and enter the toxic maze.
The major breakthrough (in the first video) is finding a way to ground pound the blue coin switch without A presses. Mario manipulates RNG for the four swoopers to fly in the desired path. Mario then does a first frame landing of a dive recover onto the blue coin and punches towards the edge of the platform. At the right moment, Mario reactivates the stored vertical speed (with VSC) by punching off the platform, and bounces on two swoopers to ground pound the block. After collecting the blue coins close to the ground (and not the topmost blue coin), Mario then waits for the other two swoopers and a snuffit to line up so that he can leave the maze by bouncing on them, collecting the coins on the exit platform, and then return to the maze to collect the enemy coins. Mario then collects the 100 coin star in the maze.
Later in 2015 (in the second video), Pannenkoek found a way to collect the topmost blue coin by bouncing on the third swooper. The primary obstacle is that there are very few swooper paths that do this since the swooper needs to stay close to Mario when the VSC to ground-pound movement is performed. Additionally, the said swooper must head towards the blue coin when the switch's effect is active. Altogether, it takes a lot of effort to find a swooper path that satisfies all of the above. With 99 coins, Mario uses a Monty Mole and the fourth swooper to simultaneously land on the exit platform and collect the swooper's coin, spawning the 100 coin star. With this strategy, Mario can collect the star at the exit of the toxic maze, instead of having to collect the 100 coin star within the maze with no way out, forcing him to exit the course by dying and then reenter it.
Other challenges
In the Coinless Challenge, excluding coin missions, all stars can be collected. The same stars can be collected in the CCC Challenge, with Metal-Head Mario Can Move! requiring falling onto the purple switch with enough speed to press it without the Metal Cap.
In the Capless/Cannonless Challenge, all seven stars can be collected.
In the No Buttons Allowed Challenge, no stars can be collected. Swimming Beast in the Cavern is almost possible, with only the small lip of the elevator preventing Mario from getting onto it.
In the No Joystick Allowed Challenge, no stars can be collected, as they all require entering doors.
In the Pacifist Challenge, every star except for 100 Coins can be collected, because there are not enough coins to collect without killing enemies.
In the B Button Challenge, the entire course is possible in 0 B presses.
In the Z Button Challenge, the entire course is possible in 0 Z presses.
In the UBER Challenge, excluding coin missions, all stars can be collected. Metal-head Mario Can Move! requires a BLJ to bypass the gate, and Navigating the Toxic Maze requires precise wall kicks to bypass the elevator.
There is an unsolved challenge in this course, to get more coins than intended.
References
- ↑ Star Dance Clip Potential: https://youtu.be/A-xTDUAU2-0?t=50s
- ↑ "SM64 - Elevate for 8 Red Coins - 0.5x A Presses [OUTDATED]" by pannenkoek2012
- ↑ "Star Heights" by UncommentatedPannen
- ↑ "HMC Elevate for 8 Red Coins 0xA 5min Strat" by UncommentatedPannen
- ↑ "SM64 - Metal Head Mario Can Move 0x Faster with HSWing" by Emilia Two
- ↑ "SM64 - A-Maze-ing Emergency Exit - 0.5x A Presses [OUTDATED]" by pannenkoek2012
- ↑ "HMC Watch for Rolling Rocks 0xA" by UncommentatedPannen
| ||||||||||||||||||||||||||||||||