Misalignment

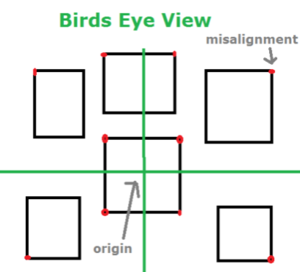
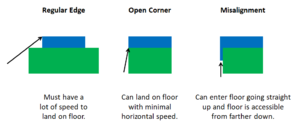
A Misalignment is a 1x1-unit area a floor hitbox extends to but wall hitboxes do not. On convex corners, they allow Mario to snap up to the floor from up to 78 units below it, as opposed to just 30 units when there is a wall hitbox present.
It is the same truncation responsible for Parallel Universes that causes misalignment; because floor and ceiling detection is done with integers, all decimal places are removed. If Mario has the right position off the floor, his position will be rounded to a spot on the floor, making the floor appear to extend to his actual position. Walls do not do this, since they use floating-point numbers, which causes the floor to not properly align with its adjacent walls.
Uses
WR TAS Time Saves
Because they allow lower jumps to reach ledges and cancel air actions immediately, they are useful for saving time in TASes regardless of their demanded precision.
- Timesaves:
- TODO
A Button Challenge
Because of the extra height they allow Mario to gain and the ability to get directly under the floor, they're very useful in the A button challenge. They also require almost no setup or allow less setup than otherwise, which makes them the preferred method over many other ABC strats. Uses include:
| Stage | Mission | Use |
|---|---|---|
| Whomp's Fortress | Chip off Whomp's Block | Getting onto King Whomp with stored VS, enabling Mario to ground-pound him without help from the elevator. This also removes the need to clone the star as Mario can ground-pound King Whomp at the star spawn location.[2] |
| To the Top of the Fortress | Getting onto a tower platform from the Bullet Bill launcher, which removes the need for slow HOLP setting in BOB as well as both the wing and metal cap.[3] | |
| Big Boo's Haunt | Secret of the Haunted Books | Used along with a Glitchy Ledge Grab to climb the stairs to the second floor[4][5]. This removed the need to defeat all five Boos on the ground floor for every mission. |
| Seek the 8 Red Coins | ||
| Big Boo's Balcony | Also used to climb the stairs, as well as entering the back room of the mansion for Scuttlebug Raising[6]. Big Boo's Balcony also had a former strategy that used a misalignment to get on the roof, but it has been outdated[7] | |
| Eye to Eye in the Secret Room | ||
| Hazy Maze Cave | Watch for Rolling Rocks (formerly) | Ground pounding into a misalignment to get enough height to land on the star platform, used in the 0.5x strategy[8]. The current 0x strategy uses a Glitchy Ledge Grab instead to reach the platform. |
| Shifting Sand Land | Inside the Ancient Pyramid | A misalignment can be used to get on the Grindel, and from there to get onto the elevator to reach the star[9]. This makes it possible to collect the star 1xA from the bottom entrance, and while it doesn't currently save any A presses, it made progress for a potential A press save on the star. |
| Dire, Dire Docks | Board Bowser's Sub | Misalignments on the cork boxes are used to reach the poles and sub[10]. |
| Pole-Jumping for Red Coins | ||
| Through the Jet Stream | ||
| Collect the Caps... | ||
| 100 Coins | ||
| Tiny-Huge Island | All missions (formerly) | Misalignments were used to enter the pipe several times to perform the Piranha Plant Glitch to get enough coins to perform a Star Dance Clip. The strategy was obsoleted with a completely different one that involved Goomba bounces[11]. |
| Tick Tock Clock | Roll into the Cage | A misalignment on the cog makes it possible to store VSC and reach the cage without a preset HOLP[12]. |
| The Pit and the Pendulums (formerly) | Also used to climb the cogs without a preset HOLP[13]. The current 0x strategy for the three stars uses a squish cancel ground pound chain instead. | |
| Stomp on the Thwomp (formerly) | ||
| Timed Jumps on Moving Bars (formerly) | ||
| Rainbow Ride | Cruiser Crossing the Rainbow | A misalignment, along with VSC and a Lakitu bounce, is used to reach the flying ship[14]. |
| Somewhere Over the Rainbow | ||
| 100 Coins | ||
| Vanish Cap under the Moat | Red Coin Star | Two misalignments are used to get on top of the Vanish Cap Switch[15]. |
| Bowser in the Dark World | Completion | A misalignment is used to get onto the platform with the moving yellow block[16]. This removed the need to perform VSC. A misalignment is also used to enter the pipe[17]. |
| Bowser in the Sky | Completion | A series of misalignments is used to climb the first few platforms, and another one is used to enter the final pipe[18][19]. |
| The Castle | Pound the Pillars | Two misalignments are used to ground pound on the pillars to drain the moat[20]. This removed the need to slowly bring MIPS all the way to the pillars. |
| Go to Bowser in the Sky | Several misalignments, along with a Glitchy Ledge Grab, are used to climb the stairs[21]. |
References
- ↑ "Interesting Misalignments #2" by UncommentatedPannen
- ↑ "WF Whomp GP using Misalignment + VSC" by UncommentatedPannen
- ↑ "WF Rollout From Bullet Bill Blaster to Tower" by UncommentatedPannen
- ↑ "Unused ABC Strats" by UncommentatedPannen
- ↑ "SM64 - GLG to BBH 2nd Floor (0x A)" by ds273
- ↑ "BBH - Eye to Eye in the Secret Room & Big Boo's Balcony - 0xA 7min Strats" by Thadortin
- ↑ "BBH Big Boo's Balcony 0xA Faster Strat" by UncommentatedPannen
- ↑ "SM64 - Watch for Rolling Rocks - 0.5x A Presses (Commentated) [OUTDATED]" by pannenkoek2012
- ↑ "SSL Pyramid Lower Entrance Strats Alternate Ending" by UncommentatedPannen
- ↑ SM64 - "Board Bowser's Sub - 0x A Presses" by pannenkoek2012
- ↑ "SM64 - Pluck the Piranha Flower - 0x A Presses" by pannenkoek2012
- ↑ "TTC Cog Misalignment on Random Setting" by Sidney600SR
- ↑ "TTC Timed Jumps on Moving Bars 1xA (without Preset HOLP) [OUTDATED]" by UncommentatedPannen
- ↑ "SM64 - Somewhere Over the Rainbow - 0x A Presses" by pannenkoek2012
- ↑ "Vanish Cap Switch Pressed in 0xA" by UncommentatedPannen
- ↑ "BitDW 207 DR" by Tyler Kehne
- ↑ "SM64 - Bowser in the Dark World (without Red Coins) - 0x A Presses" by pannenkoek2012
- ↑ "BitS Beginning - 0x A Presses" by Tyler Kehne
- ↑ "BitS Warp Pipe using 207 DR" by pannenkoek2012
- ↑ "Pound the Pillars Using Misalignment" by UncommentatedPannen
- ↑ "50 Star Room Stairs - 0x A Presses" by Tyler Kehne

