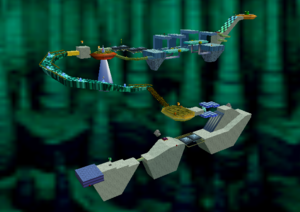
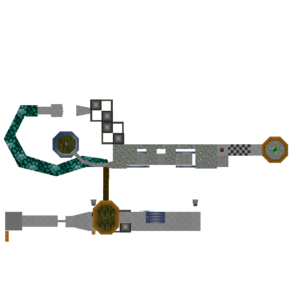
Bowser in the Dark World
- For a tutorial on speedrunning this star, see the RTA Guide
- For a tutorial on RTABC for this star, see the RTABC Guide
| Bowser in the Dark World | |

| |
| Course Info | |
| Abbreviation | BitDW |
| Terrain | Default |
| Setting | Dark |
| Water | None |
| Course Items | |
| Coins | 74 ( |
| Enemy Coins | 6 ( |
| Stars | |
| Caps | |
| Star Navigation | |
| Overview | |

| |
Bowser in the Dark World is the first Bowser level of Super Mario 64. It can be accessed from the big star door of the first floor, which requires 8 stars to open.
Excluding the Moat Door Skip glitch (MDS), collecting the key from this level is mandatory to beat the game, as otherwise the basement courses of the game cannot be unlocked.
Coins
| Location | Count |
|---|---|
| Coin ring above moving platforms right after first flame shooter | 8 |
| Sloped line of coins after second flame shooter | 5 |
| Single coin above turning blue platforms | 1 |
| Sloped line of coins after goomba platform, on bridge | 5 |
| 3 coins in ! block on platform after crystals | 3 |
| Vertical line of 3 coins over turning platforms (after above) | 3 |
| Coin ring above moving platforms (after above) | 8 |
| 4 coins on curved path that leads to the 3rd ! block | 4 |
| Ring of coins by 3rd ! block | 8 |
| 3 coins on each titling platform at end | 6 |
| 2 coins above the last titling platform | 2 |
| 5 coins before pipe at end (use ! switch and climb up the stairs) | 5 |
| 6 Goombas | 6 |
| 8 red coins | 16 |
| Total | 80 |
A Press Counts
In the A Button Challenge, it takes no A Presses to beat the level regardless of whether or not the player goes for the red coin star.
| Objective | A Presses | Minutes |
|---|---|---|
| With red coin star | 0 | 3 |
| Without red coin star | 0 | 2 |
Entering Bowser in the Dark World (0x)
- Original Strategy: https://youtu.be/mlHzqJn2SMs?t=5m52s
- With 0 Stars: https://youtu.be/58rxoSSshw4
Entering the course is easy - simply go to the trapdoor and fall down naturally.
It should be noted, however, that with speed conservation, it is possible to enter the course with 0 stars by exiting Bob-omb Battlefield with 227 stored speed, redirect Mario's direction using the second key door text, and clip through the 8-star door. This allows entering Bowser in the Dark World with zero stars. The strategy is vital as part of the plan for entering Secret Aquarium in 0 A presses.
Within the course (0x)
- With red coins: https://youtu.be/UCmPvInKa9E
- Without red coins: https://youtu.be/b0vDJmsvVBw
Mario is able to navigate the course without the use of A button to jump, as the geometry is mostly flat. The elevators can be reached with a precise dive recover. Throughout the course, there are three difficult sections: The Crystal, named after its vicinity to the nearby structure that is too high to reach with a dive recover, where there is a yellow back-and-forth platform below; The Seesaws, where they must be tilted to very steep angles to reach the red coins; The Warp Pipe, where a misalignment must be utilized to get on top to enter the Bowser fight. An optional section of The 4th/6th Red Coin is required if red coins are collected.
The Crystal
- Old Strategy (VSC): https://youtu.be/6eI8D85WG7w
- New Strategy (207 DR): https://youtu.be/U4vcFxz0F3g
This section is named after the object that originally facilitated Mario to reach the next structure via Vertical Speed Conservation. As the Crystal has a strange hitbox, it displaces Mario's position if he gets into a certain spot, allowing him to store 26 vertical speed. Mario then punches towards the structure with the yellow moving platform, duck down to avoid the amps hitting him, and pops onto the structure, saving an otherwise mandatory A press in a full game run.
Later, Tyler Kehne demonstrated that a very precise dive recover to utilize the misalignment is possible in the course. It was previously thought to be impossible due to the inconvenient angle, but it was eventually worked out on May 5, 2018, with diligent efforts of Iwer Sonsch and bad_boot, while Jongyon worked on the math calculations.
The 4th/6th Red Coin
Originally, for this optional segment for red coins, Mario had to bump into a Goomba, luring it to drop onto a narrow bridge. Mario then left to collect the 6th red coin on the lonely island and then came back to bounce on the Goomba, getting back into the main segment.
Later, Lord SNEK proposed a timesave where Mario would go straight from the platform with the 207 DR to the platform with the spire, then do a precise rollout back onto a platform nearby. This was solved by Jongyon and Iwer Sonsch. It's now done as the 4th red coin.
The Seesaws
Tilting the seesaw and using frame-walking to reach the higher platforms is sufficient, yet it can be done even faster by dive-recovering on steep slopes using pause buffer. Therefore, Mario has no problems getting past the seesaws and reach the bottom of the activatable stairs. Mario also has no issues getting the remaining two red coins for the red coin star in the 100% run.
The Warp Pipe
Instead of activating the stairs to get up, Mario grinds on the slope with repeated dives to gradually rise to the top of the stairs. If Mario collected all red coins, he would now collect the star. Afterwards, Mario aims at one of the misalignments of the warp pipe and lands on the pipe with a precise 207 dive recover to avoid the wall hitboxes and snap onto the top of the pipe. Finally, Mario defeats Bowser in the fight and collects the first key of the game.
Other Challenges
In the Coinless Challenge, the key can be collected. It can also be collected in the CCC Challenge.
In the Capless/Cannonless Challenge, both the star and key can be collected.
In the No Buttons Allowed Challenge, neither the key nor star can be collected.
In the No Joystick Allowed Challenge, only the key can be collected.
In the Pacifist Challenge, both the star and key can be collected, as Bowser is an exception to the pacifist rule. Defeating Bowser in this course is not required anyway because the fight can be bypassed with the Moat Door Skip.
In the B Button Challenge, the key requires 1 B press to grab Bowser. However, this is not necessary to do because the entire fight can be skipped with Moat Door Skip.
In the Z Button Challenge, the entire course is possible in 0 Z presses.
In the UBER Challenge, the key can be collected.
There is an unsolved challenge in this course, to reach a Parallel Universe from both areas of the level.
References
| ||||||||||||||||||||||||||||||||