STROOP
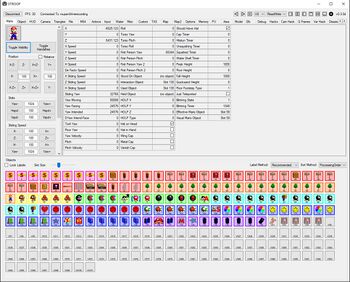
SuperMario64 Technical Runtime Observer and Object Processor, or STROOP for short, is a diagnostic tool for Super Mario 64 which displays and allows for simple editing of various game values and information. It can connect to a running emulator and update values in real time. Some core features include views of loaded/unloaded objects, Mario structure variables, camera + HUD values, an overhead map display, and many more.

History
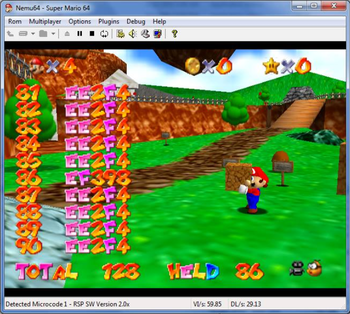
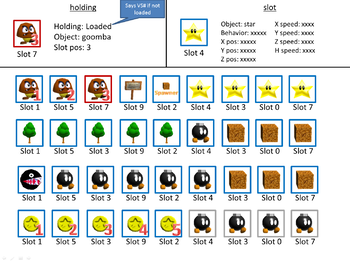
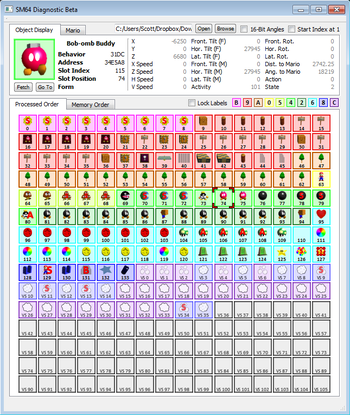
After Pannenkoek2012 discussed object slots in his Science of Cloning video, there had been a desire to view the object slots of the game in real time. Pannenkoek2012 discussed this desire with Tyler Kehne. Tyler then proceeded to make a ROM hack that could display the object slot behaviors in text form, overlaid onto the screen. Pannenkoek2012 was not pleased with this implementation, as he wanted a separate program that would show the slots visually with images of the objects. Thus, Tyler then proceeded to make a program that would do just that, which he named the SM64 Diagnostic. Tyler wrote the code for it, and Pannenkoek2012 provided the object images and names. The SM64 Diagnostic was a major breakthrough, as it showed the object slots, the process groups, the held object, object variables, and Mario variables. However, it also had some annoyances, such as it couldn't connect to an already open Mupen (it had to open Mupen itself), it would occasionally crash Mupen, the angle variables (yaw/pitch/roll) had confusing names, the variables couldn't be edited, and the checkbox variables used a confusing system.
Some time later, Dane Bouchie created a new program called STROOP, which was based on the SM64 Diagnostic, but with many more features and improved functionality. Later, Pannenkoek2012 also began coding for STROOP, adding even more features and functionality. As of today, STROOP has object slots, object variables, Mario variables, HUD variables, camera variables, triangle variables, water variables, an input display, a file display, a map that can display objects in real time, an M64 editor, and savable options so that the user can customize their experience.
Loading Screen
When first opening STROOP, you'll be greeted with a loading screen. This displays what is currently being initialized, as well as a random helpful hint.
Connection Screen
After STROOP finishes loading, you'll encounter a screen where you can choose what process to connect to. There are various buttons to use:
- Refresh: Refreshes the list of processes to choose from.
- Connect: Connects STROOP to the currently selected process.
- Bypass: Bypasses the start screen. Note that most functionality won't work if you press this, as most functionality relies on having a data stream to interact with. But this could be useful if you only want to use the M64 editor, for example.
- Refresh & Connect: Refreshes the list of processes to choose from, and then connects STROOP to the currently selected process. This can save a button press in the case that you need to press both Refresh and Connect.
- Open Savestate: Connects STROOP to a savestate, chosen from the File Manager. This can be useful if you want to modify values in a savestate, such as global timer or RNG.
Top-Level Controls
On the top of STROOP are several controls that may be of use. These are:
- Disconnect Button: Disconnects from the current process or savestate. Right click on this for the option to save a savestate after it's been modified.
- FPS Counter: Displays the number of frames per second that STROOP is running at. By default, STROOP aims for 30 FPS. However, this can be changed in the Options tab.
- Connected To: Displays the process that STROOP is currently connected to.
- Left/Right Arrow Buttons: These can be used to reorder tabs. Simply click on one of the arrow buttons and the currently selected tab will move one spot over in that direction. Right click on these buttons for an option to restore the tabs to the recommended tab order. Separately, you can click on the arrow buttons while holding control, and this will move the currently selected object slots over one spot in that direction. Furthermore, you can click on the arrow buttons while holding a number n, and this will move the currently selected object slots over n spots in that direction.
- Add Tab Button: Click on this button to see a list of tabs that have been hidden. Click on one of these tabs to restore that tab. Alternatively, click on "Restore All Tabs" to restore all of the tabs.
- ROM Version: This displays the ROM version that STROOP is currently operating under. By default, it tries to auto-detect what ROM version is being used. However, if you want to use a specific ROM version instead of the auto-detected one, then choose one of the ROM version options without the "AUTO" prefix.
- ReadWrite/ReadOnly Mode: This displays whether STROOP is is ReadWrite mode or ReadOnly mode. By default, it will be in ReadWrite mode, allowing the user to modify variables. In ReadOnly mode, modifying variables won't work.
- Panel Hide/Show Buttons: These 6 buttons allow you to adjust which panels are hidden/shown in any tab of STROOP. In order from left to right, these are: Left Only, Left + Right, Right Only, Bottom Only, Bottom + Top, Top Only. By default, these buttons will only affect the outermost panels. However, for situations where there are nested panels (e.g. the Memory Tab), you can control which set of panels is being targeted by holding down a number key. Specifically, holding down the number n will target the nth set of panels, where panels are indexed from outermost to innermost. Thus, holding down the number 1 is equivalent to not holding down any number, since it automatically targets the outermost pair of panels. Holding down 2 or higher will affect other panels, assuming they're on screen.
- Cog: The cog can be used to quickly and easily toggle savable options, to reset saved options, or to go directly to the Options tab. For more information about the savable options, see the Options Tab section.
- Version Number: This displays the current version number of STROOP. Right clicking on this provides debugging/developer options, most of which aren't intended for the casual user. Nevertheless, some useful options include:
- Enable TASer Settings: Switches to the TAS tab, hides the left panel, filters variables to show only the TAS variables, and enables the STROOP ROM hack. This setting was created for Plush's convenience.
- Show MHS Vars: Opens a Pop Out with variables commonly found in MHS. This is a convenience for users that are used to using MHS.
- Download Latest STROOP Release: Downloads the latest STROOP release. This downloads as a separate file, instead of replacing the currently-being-used STROOP file.
- Show All Helpful Hints: Shows a list of all helpful hints from the loading screen.
- Show Skribblio Words: Shows a list of all Skribbl.io words in a randomized order.


